Sorry I didn't post a menu last week. The stomach flu made the rounds through our entire family and then we had an out of town trip. Excuses, excuses, right? So, our stomachs are strong once more and we are ready for some serious eating. Here we go...
Meal #1: Breaded Chicken Breasts with Creamy Roasted Broccoli (OMG - I saw this on 5 Ingredient Fix over the weekend and HAD to have it!)
Meal #2: Mexican Style Vegetarian Stuffed Peppers (wish me luck...I totally made this one up - will share if it is a success)
Meal #3: Red Curry with Cauliflower, Yam, and Chickpeas over Rice
Meal #4: Fettuccine Alfredo with Tossed Salad
Meal #5: Creamy Carrot Soup and Grilled Cheese (a total cheat - I froze it last month)
Dinner Party Meal: Still undecided, but I may do a Thai theme...so I may omit meal #3, switch it up to chicken, eggplant, and pepper along with Pad Thai, Cucumber Salad, and Butterflies - those delicious cream cheese and crab deep fried things. Maybe mangoes and rice or black rice pudding for dessert. What kind of cocktail do you serve with Thai food? Totally taking suggestions!
What are you cooking up this week? Please leave a comment and share - I get so much inspiration this way!
Have a great and productive week!
Monday, March 28, 2011
Tuesday, March 22, 2011
Salt and Pepper Shaker Cozy Tutorial
Never in my life did I think that I would sew a cozy for a salt and/or pepper shaker. But, alas, here I am. Here is my defense. I can't seem to leave any sort of salt and pepper shakers within reach of Little Bean otherwise her food ends up inedible. So, I decided I needed to get the grinders - well, at Williams Sonoma, they are like $50 each. So, Bean and I were perusing the aisles of Costco and came upon large plastic versions for sea salt and pepper. But, the ugly Kirkland labels were not something that I wanted to leave out on my table or on my counter. Justified? I think so.


 Fabric you'll need:
 Iron on the interfacing to your letter fabric.

Carefully cut out your letters.

Using scotch tape to adhere the letters to the interfacing, attach them upside down, as pictured.

Carefully cut out your letters in fabric. Remove second piece of paper from interfacing and iron down to fabric strip. I didn't get a photo of it, but I stitched around the edge of the letters just for extra security.

Place fabric strips right sides together and stitch all the way around leaving an opening to turn it right side out.


Once you have it turned, press it, being sure to press the open edge as you would like it to be sewn closed.

Now cut a piece of elastic, approximately 2 1/2". Fold it in half and insert the ends into the opening to form a loop. Pin down. Top stitch all the way around being careful to sew the opening closed.

On the opposite end from the loop, hand sew a button down so it will be even with the loop.

Now you too can say that you have made a salt and pepper cozy. Ha ha. But seriously, Costco, under $10, super cute.


Here are the grinders before (minus the labels - I needed quite a bit of Goo Gone to get those puppies off):

First you'll want to pick out your font for your letters. I used Stencil Std in MS Word. Based on exactly how big you want your letters, set the font at around 100. This took a little bit of printer ink to get just right.

- four strips of fabric 8 1/4" x 3"
- two small pieces of scrap fabric for your letters
- two small pieces of double sided interfacing
- ~5 inches of 1/4" elastic


Carefully cut out your letters.


Carefully cut out your letters in fabric. Remove second piece of paper from interfacing and iron down to fabric strip. I didn't get a photo of it, but I stitched around the edge of the letters just for extra security.

Place fabric strips right sides together and stitch all the way around leaving an opening to turn it right side out.


Once you have it turned, press it, being sure to press the open edge as you would like it to be sewn closed.


On the opposite end from the loop, hand sew a button down so it will be even with the loop.

Now you too can say that you have made a salt and pepper cozy. Ha ha. But seriously, Costco, under $10, super cute.


Sunday, March 13, 2011
Meal Plan 3/13 - 3/19
This past week has been so incredibly crazy busy. I have a to-do list a mile long and my house is a mess. But, all of the pressing things have been done and we got to get out in the sunshine yesterday (I think it was the warmest day in six months, a balmy 50 degrees) and take Little Bean to the St. Patty's Day Parade and get to a birthday party as well to see some great friends. So, all in all, a great weekend.
I'm loving doing this week's meal plan because I only have to plan through Thursday, a five day food week is much easier. So, I have based this week's plan around food that needs to be eaten in the fridge/freezer.
Meal #1: Falafel, Hummus, Pita Bread, and Tzatziki with Feta and Tomatoes
Meal #2: Strata with Mixed Greens and Blackberry Salad (I need to blow out a bunch of eggs for a craft, so I've gotta put them somewhere!)
Meal #3: Lentil Soup with Whole Grain Bread
Meal #4: Pumpkin Pasta with Chicken Sausage
Breakfast #1: Pumpkin Bread (I had to use a cup of pumpkin last week and you can only buy those giant cans around here. Pumpkin overload.)
Cakes From the Weekend
I am honestly so touched when friends of mine ask me to do their families cakes. As many of you know, I used to be a pro decorator, but mommy hood has put that career on the back burner. It is something that I am so passionate about and have so much fun doing.
The first cake was a volcano cake for my friend's son who was turning 8 (I think!!).


The first cake was a volcano cake for my friend's son who was turning 8 (I think!!).

Up next is a cake for another friend's daughter's sweet sixteen. All I was told was they wanted white, black, and purple. Here's what I came up with.

Have a great day everyone!
Thursday, March 10, 2011
Wipeable and Reversible Placemat Tutorial
I have been trying to figure this out for a while now. I want my table to be dressed nicer, but with a toddler around, it is just not practical to have linens on the table. I thought maybe to use oilcloth, but it tends to split fairly easily, so turning would be a problem. Then I thought I could avoid turning by using bias tape, but then the bias tape would get dirty. Them I came across a blog post (which I lost the link, ugghhhh!) that used dollar store foam placemats and covered them with fabric and iron-on vinyl. I was so excited - I had never heard of iron-on vinyl before.
So, I decided to skip the foam placemat and just make mine with fabric.


 I hope you enjoy these as much as I do!
So, I decided to skip the foam placemat and just make mine with fabric.

I am really happy with the result.
Here is what you'll need to make 4 of these:
- one yard of home decor weight fabric
- one yard of complimentary fabric, preferably home decor weight, but not necessary
- 3 packages of iron-on vinyl (2 yds x 17" per pack) - creative couponing at Jo-Ann's worked well for me here.
- Corresponding thread
- Iron
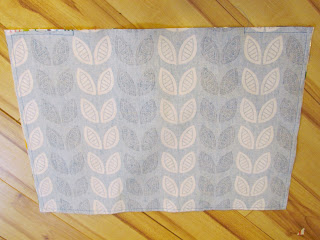
Start by cutting out your fabric pieces. Each piece should be 19.5" x 14". be sure to pay attention to which way you want the print to go on your placemat.

Next, cut out your vinyl pieces.
 |
| Yes, I am aware this is upside down, but I'm running out of time :) |
Now is your chance to iron out your fabric perfectly smooth. Hold the steam though...you don't want your fabric wet.

Peel off the vinyl piece from the backing.

Place it on top of the RIGHT side of your fabric.

Smooth out.

Now place the paper piece on top of the vinyl.

With your iron on medium heat and no steam, begin pressing...follow package instructions to be sure you get a good bond.

Now flip your fabric piece over and press again.


Turn it back over and peel off the paper. Voila. Repeat with the other 7 fabric pieces.


Now place your two different fabrics with right sides facing each other. Do not pin as you'll puncture the vinyl. Carefully sew around the edges leaving a large hole for turning - this is much more difficult to turn than regular fabric...leaving a large opening will help cut down on wrinkling.


Note how I sewed "into" the piece before I started sewing around the edges. This helps keep everything more stable when you are turning.
Cut all four corners on the diagonal.

Turn the placemat inside out. it will be a wrinkly mess:. Don't worry.

Go back to the ironing board. Fold under the opening and hold it steady. meanwhile, place the paper that you used for pressing back on top and iron the opening. Warning: The two sides will fuse together...so you only get one shot here. Now continue to press the whole placemat, both sides. I found that using high heat here was very helpful.
 |
| Much better, right? |

Now top stitch all around. Tip: Use a dark colored thread, otherwise with frequent wiping, light colors will become very dingy.
So, there you are...a super easy and fun way to update your kitchen table. I love how I can mix and match them to suit my mood/decor.


Sunday, March 6, 2011
Meal Plan 3/6 - 3/12
Sorry for not posting last week...it was an uninspired week in the culinary sense. Life has just been go, go, go lately. Okay, enough excuses already. This week will be a different story (somewhat). But, before I get to that...
I think Spring is officially on its way (crossing my fingers and toes). Even though it snowed this morning, I was able to capture these photos just minutes ago.


It just made me smile to see these little Robins. Aaah.
On to food...
Meal #1: Curried Vegetable Samosas with Cilantro-Mint Chutney and Mangoes
Meal #2: Peanut Chicken in the Slow Cooker with Rice and Steamed Broccoli
Meal #3: Asparagus Soup and Pesto, Mozzarella, and Goat Cheese Paninis (Little Bean is OBSESSED with goat cheese!)
Meal #4: Fajitas with Chicken, Beans, Peppers, and Onions with Guacamole
Meal #5: Minestrone Soup in the Slow Cooker (I was planning on making Eggplant Marinara and Penne...but I couldn't find an eggplant at the store today???)
Meal #6: Apple, Cucumber, Goat Cheese Salad with Mint Vinaigrette and Crusty Bread
So, as many of you know, I buy organic chicken...usually I try to stick to one meal per week with meat to cut down on the astronomical cost. Well, this week I went nuts and spent $30 on chicken!!!! Shhhh...don't tell Daddy Bean. Next week will be a beans and rice week for sure!
Have a wonderful week!
Subscribe to:
Posts (Atom)