I hope all of my US friends had a lovely Thanksgiving. For the most part ours was nice. Definitely interesting. My favorite quote is what my nephew (age 4) said to me at the table "Amy, did you know that you're gonna die before me?" Well, all I can say is, I hope so. Little Bean came down with a nasty double ear infection the next day while we were still out of town. I am so thankful for urgent care centers and antibiotics. And after we got home, we were assaulted by mother nature who sent us over a foot of snow. And here's a tip for those boring winter afternoons: Dump out a box of crayons - we used the 64 pack - and put them back in by color. You must do this as a group. Seriously, this is so much fun...and causes quite a bit of controversy.
So, my meal plan this week is going to be really sketchy. We have tons of leftovers from Thanksgiving dinner #2 last night and we are throwing a Christmas party on Saturday night and my birthday is in the middle of the week. So, don't expect too much inspiration here.
Meal #1 and 2: Thanksgiving Leftovers (as is)
Meal #3: Chickpea Curry
Meal #4: Mom's Turkey Soup and Rolls
Meal #5: Birthday Surprise - this both intrigues and terrifies me
Meal #6: Christmas Party - will make a separate post with details
Meal #7: Turkey and Angel Hair Pasta with a Parmesan White Sauce
That's it. Stay tuned for the Christmas Party menu...I'm still working it out. If anyone has any suggestions for easy appetizers/finger foods, PLEASE share. I could use the help!
Sunday, November 28, 2010
Sunday, November 21, 2010
Meal Plan for November 21-27
This meal plan was pretty easy to come up with since Thursday is a no-brainer. Yay Thanksgiving! We are headed to my Mom's for the big day, so I don't have to cook the full meal...until Saturday. I will be making out family the full dinner on Saturday since we received a (small) turkey for free this year.
Here goes:
Meal #1: Stir Fry with Tofu and Vegetables
Meal #2: Pesto Pizza with Artichoke Hearts and Salad
Meal #3: Broccoli and Cheese Pasta Bake
Contributions to Moms Thanksgiving Dinner: Yam Casserole with Orange Zest, Pecans and Brown Sugar and Creamed Spinach (I will make doubles and freeze half for Saturday's dinner).
Saturday Thanksgiving Meal: Turkey with Gravy, Mashed Yukon Golds with Garlic, Stuffing, Creamed Spinach, Yam Casserole, and Pie...probably pumpkin. I'll pass on the Cranberries, I think :)
Happy Thanksgiving everyone!
Holiday Inspiration Links
Well, my posts have been few and far between lately since I don't have a functional camera. My husband is being cruel and making me wait until my birthday to actually get it. Oh well.
I have been very busy in the Christmas department though. I have been making many, many throw pillow covers, because yes, I am obsessed with them. I have made ornaments for my tree and I have been making gifts galore.
Here are some of the tutorials/patterns that I have been working from to get you inspired.
First, if you haven't made a Circle Skirt yet, you MUST. It is so easy and so flattering. The only drawback...it does take quite a bit of fabric for an adult skirt. The circle skirt tutorial is from MADE. I have made gifts, two for Layla, and one for myself.
A friend of mine shared this pattern from Spool for a bird mobile a few months ago. When I saw it, my husband said that those would make great Christmas ornaments...and boy was he right. I enlarged the pattern so that the birds are about 10" long when finished. I can't wait to show them to you.
And finally, this tutorial for a ruched throw pillow from Delia Creates is just terribly cute. I had to make one. It turned out great. The best part, I made a white one, just like the onle featured and not only will it go with my Christmas decor, but everything else too!
Jeremy's staff is always a hard one for me... I never know what to do. This year, I am already done. I can't believe it. I made them all those rice warmer bags (with lavender oil) - you know, the ones you pop in the microwave and put on sore muscles. Super easy and pretty inexpensive. I am also giving them jars of Homemade Taco Seasoning - I got the recipe from $5 Dinners. I have tried it and it is awesome. The best part - NO sodium! I got these great little jars at Hobby Lobby for $1 each! I will print up a little recipe card and attach it to the jar. A great gift!
I will post pictures of these lovely crafts on or after December 2nd (my birthday - when I am allowed to have my camera). I hope, in the meantime, that these tutorials will inspire your Christmas crafting.
Sunday, November 14, 2010
Menu Plan for November 14-20
Two weeks of successful menu planning...can't stop now! I am loving how easy this makes my week nights. has anyone else started menu planning (if you weren't already)? It's great, right?
I'm going to stop putting nights of the week and instead just put meals...I mean, y'all don't really want to know when I'm eating leftovers. Sooner or later I need to start throwing in one new recipe a week as one reader suggested...maybe once I get a handle on all of my holiday projects!
Meal #1: Steelhead and Roasted Potatoes with Dijon Sauce and Peas
Meal #2: Veggie Chili and Cornbread
Meal #3: Tuna and Artichoke Heart Melts with Tossed Salad
Meal #4: Falafel with Pita and Greek Salad
Meal #5: Veggie Scramble with Fried or Roasted Potatoes
It's a pretty simple line-up this week. But I'm feeling pretty simple today. I have a lot of items with beans and I am all out in my freezer, so each day I need to be cooking a different type of beans. If you don't cook your own beans (and buy canned instead), consider trying it out. It is so much cheaper and there is no sodium in home cooked beans (have you read the label on canned beans??). Here's a how-to on A Year of Slow Cooking.
Have a great week!
Wednesday, November 10, 2010
Advent Calendar Garland Tutorial
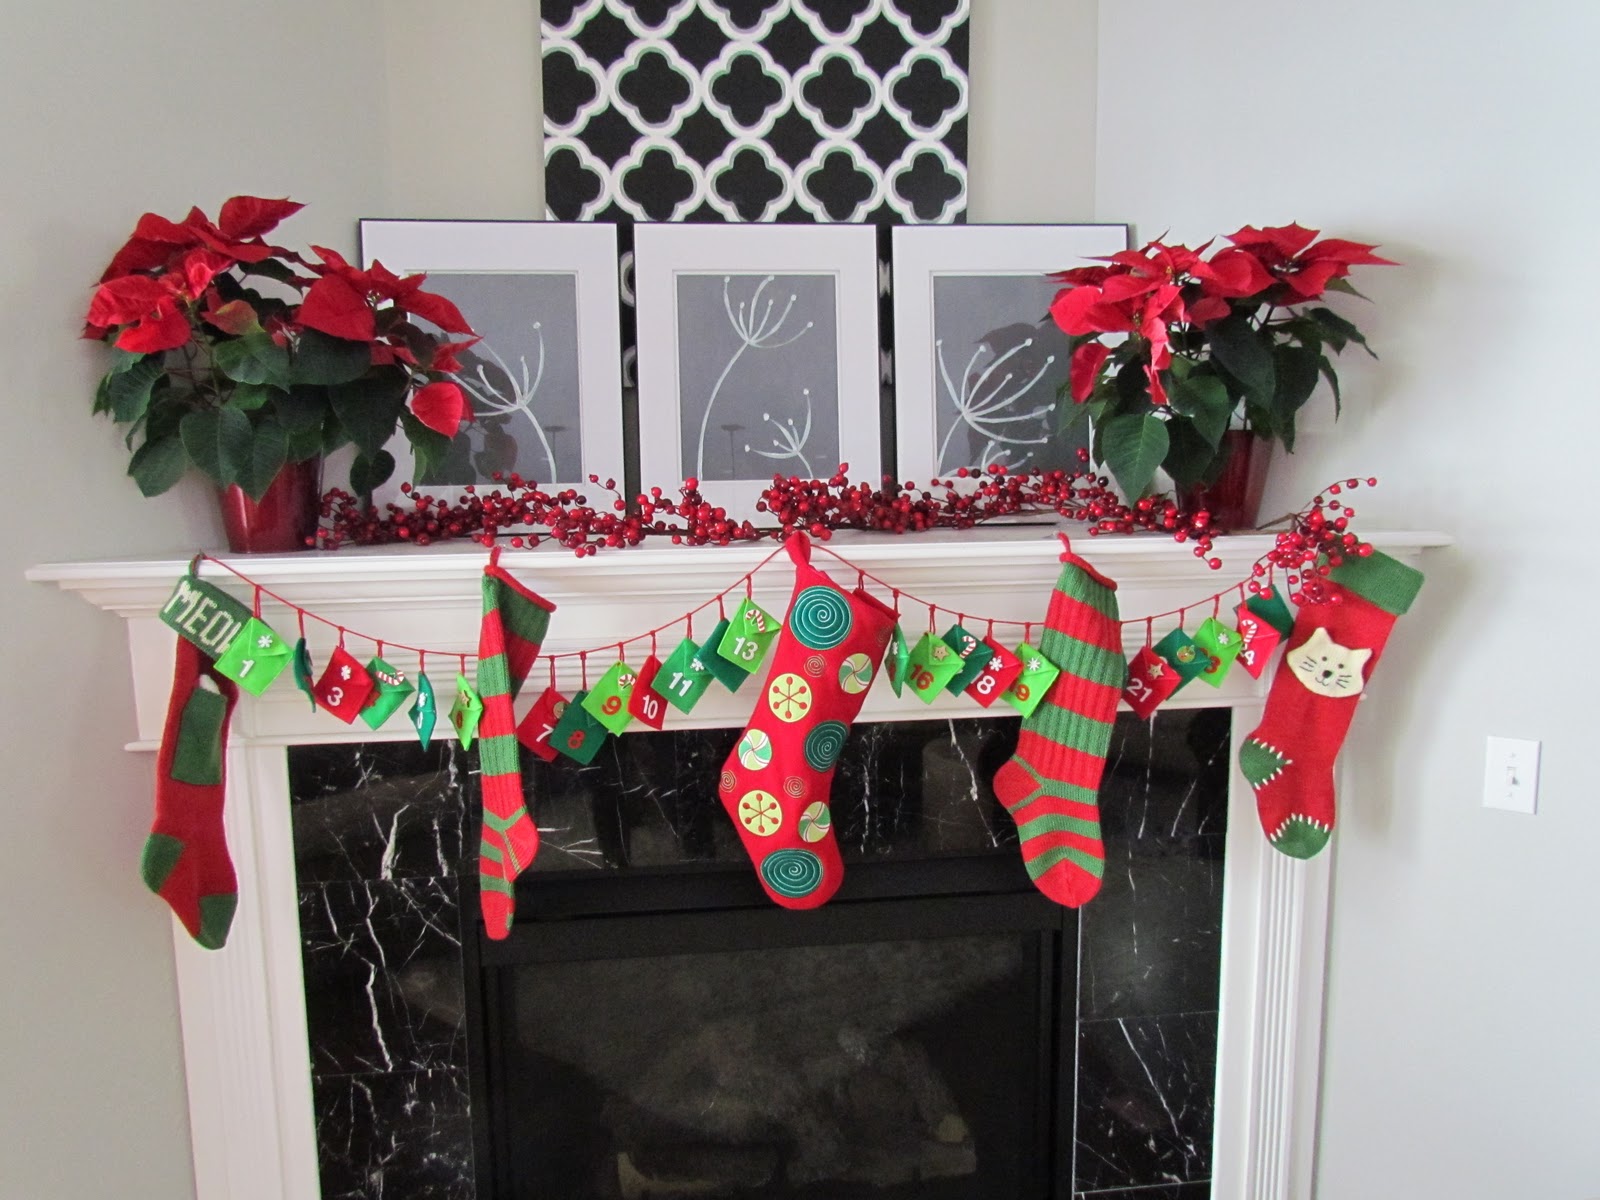

I got the idea after flipping through the Garnet Hill catalog and I came across this beauty:

The only downside to the Garnet Hill version would be the cost: $58 plus shipping. So, count me out. The GH version are little knit packages with big wooden buttons with the numbers "burned" on. Well, I can knit, but man, oh man, would that take a long time. And I don't know how to solder (do I even know how to spell it - ha!). So, here is my easy (although a little time consuming) version.
Here is what you will need:
- 7 sheets of felt (I used red, lime green, and forest green)
- various buttons
- thread
- festive rope (~9 feet long)
- felt numbers (more on this later)
- matching yarn
- large needle - I used a tapestry needle

You should be able to get four of these out of each sheet of felt. Once you have cut out all twenty-five, yes, twenty-five, you get to move on to button holes.
I really hope you have a button-holer on your sewing machine. If not, you might want to use snaps or something else. If you have a button-holer, then get familiar with it. Once you know how to use it, it's an absolute cinch. I put my sewing machine right by my computer so I could read blogs while I "sewed." The size hole you make will depend entirely on the size of buttons you find. I just did all my holes to fit the largest buttons and it worked out great - that way I didn't have to plan ahead exactly how I was going to lay them out (and then somehow remember). You'll want your button holes centered in the triangle flap piece. Here is a closer up shot of the buttons I found.

It's hilarious, because normally I wouldn't be drawn to these styles at all, but somehow all together I really like them.
Anyhoo - the next step is to fold up your little pouches and sew them up. Match the four corners together and sew all the way around the outside leaving about 1/8" edge. Sew up and around the traingle "flap" too. I used white thread to contrast, but do whatever you like.
Next, sew on your buttons. I detest hand sewing, but even I can handle this. Super easy.
Okay, we're ready for those felt numbers. THIS was not easy. Every single craft store (online and elsewhere) sells felt letters, but not felt numbers. I almost went crazy. There is ONE exception. Michaels carries "Stick-it" brand felt letters and numbers (yes, you have to buy the letters too) for $4.99 IN STORES ONLY. I got by with 3 packs and had to make about 4 numbers (I think) by myself. If you have the coupons, it's not too expensive. Plus, you have all the letters left over for something else. Note to self: Think of a craft to use up all those letters and post tutorial. If you have a Cricut, consider making felt numbers for all of your friends.
Last step! Thread some yarn through your large needle. Create a loop in the corner of your package to hang on the rope. Be sure to make the loop long enough that you will be able to pull the package through it in order to secure it to the rope. Once all your loops are made, hook them on to the rope (in numerical order, of course).
Now that it's all ready to go - isn't it December 1st yet? Layla keeps saying "Put candy in there." Sorry, little bean, a few more weeks!

Monday, November 8, 2010
Camera Shopping
After the incident with Little Bean the other day, my camera is taking even worse pictures (if you can imagine that). Seriously, I've been trying to do tutorials and I just can't. I feel as though I am at a total standstill. So, with the help of my dear friend, and photographer, Jill, I am trying to find the perfect camera for me and for my budget.
She has convinced me that a Canon is a great way to go (which is what I've pretty much always had). I don't pretend to know how to use an SLR, nor do I think I really want to try...I don't think I have the time or the patience. One of the cameras that she has recommended is the Canon PowerShot SX20IS. There is also a Canon PowerShot SX30IS for the same price with more features (but no reviews that I can find). Does anybody have this camera? Maybe it's new on the market?
I would LOVE to hear any advice on cameras that anyone may have. Please keep in mind that I am more than an amateur...I don't know very much at all. All I really want to be able to do is be able to blur out the background and be able to take really close up pictures of smaller objects. I am not trying to win any competitions here. :)
Thanks so much! Tutorials to come!
Sunday, November 7, 2010
Meal Plan for 11/7/2010
I am really excited because I actually stuck to last week's menu plan. Something about actually putting it in writing gives me accountability.
So, here's the plan for this week.
Sunday: Roasted Eggplant and Red Pepper Paninis with Salad
Monday: Red Beans and Rice in the slow cooker
Tuesday: Bean Burgers (from scratch) with Sweet Potato Fries
Wednesday: Homemade Macaroni and Cheese with Green Beans
Thursday: Jeremy has a meeting so leftovers or cereal!
Friday: Homemade Pumpkin Soup and Grilled Cheese
Saturday: Leftovers or Tuna Melts
As with last week, I built my menu on what I had on hand that needed to be used up. If you don't count the $20 that I spent on cat litter, my grocery bill for the week was only $40. That is miraculous for me. And yes, that's with no coupons or anything.
I'm happy to share recipes. If any of our meals sound particularly appealing to you, let me know and I will post the recipe (after I give it a trial run, of course).
Wednesday, November 3, 2010
Toddler Dress Sizing...my best guess
I have had a few comments asking me what the measurements would be for different sized toddler clothing. While the overall answer is, I don't know, I have searched and found some info for you.
My daughter just turned two, but she is at the 90th percentile for height and 40th for weight. Keep that in mind when I give you the adjusted numbers here. I make everything to fit her (not by a set size). From clothing measurements by several companies, it appears that 2" is added to the length for every year. So, if a 2T is 21.5" long, then a 4T would be 25.5" long. I would also add 2" to the sleeve length. It also appears that you want to add about 3/4" for every year for the chest measurement (i.e width of the dress).
Here is what I have come up with for a 4T:

 For the 4T, I would also make the armpit cut another 1/2 deep, so 6.5" instead of 6". I have added 1" additional fabric for the circumference of the arm. This might be a little excessive, but you can always cut it out if you need to.
For the reader who asked about 18 months sizing, you can just cut all of the adjustments listed above in half. Although, if it were me, I would just follow the 2T measurements because this dress is VERY forgiving size wise and the 2nd birthday will be here before you know it!
Please let me know how this works out. You can post any adjustments in the comments which would surely be helpful to other readers. Thanks!
My daughter just turned two, but she is at the 90th percentile for height and 40th for weight. Keep that in mind when I give you the adjusted numbers here. I make everything to fit her (not by a set size). From clothing measurements by several companies, it appears that 2" is added to the length for every year. So, if a 2T is 21.5" long, then a 4T would be 25.5" long. I would also add 2" to the sleeve length. It also appears that you want to add about 3/4" for every year for the chest measurement (i.e width of the dress).
Here is what I have come up with for a 4T:


For the reader who asked about 18 months sizing, you can just cut all of the adjustments listed above in half. Although, if it were me, I would just follow the 2T measurements because this dress is VERY forgiving size wise and the 2nd birthday will be here before you know it!
Please let me know how this works out. You can post any adjustments in the comments which would surely be helpful to other readers. Thanks!
Monday, November 1, 2010
Toddler Party Dress with Puffy Sleeves
I made this dress for Layla's birthday party and it got a lot of great feedback, so I thought that I would do a tutorial for it.


 The tutorial will be in a different fabric since I was totally winging it with the first one and I didn't take any pictures (honestly, cause I had NO idea if it would actually amount to anything). This fabric is a repurposed long skirt that I bought years ago for a holiday party and of course is no longer in style. My plan: to make a mini skirt for me for our Christmas party and a matching dress for Layla.
You will need the following supplies for this dress:
This is for a size 2T:


Now, just cut around the very bottom of the armpit piece and then remove the dress piece. Instead of following around the rest of the armhole, you are going to cut an arc from the bottom to midway along the top of the sleeve piece. See below. Repeat with other sleeve.


Fold your sleeves over as little as possible and iron down and then fold over 1/4" again. Iron down. Do the same thing with the hem of the dress.
Lets finish off the sleeves. For the bottom of the sleeve, I just manually do about 3 pleats/gathers and then pin them down (right in the center). Now sew the seam as you normally would.

It should look like this, although hopefully less blurry :)

Go ahead and sew the hem of the dress now as well since you have it all ironed out.
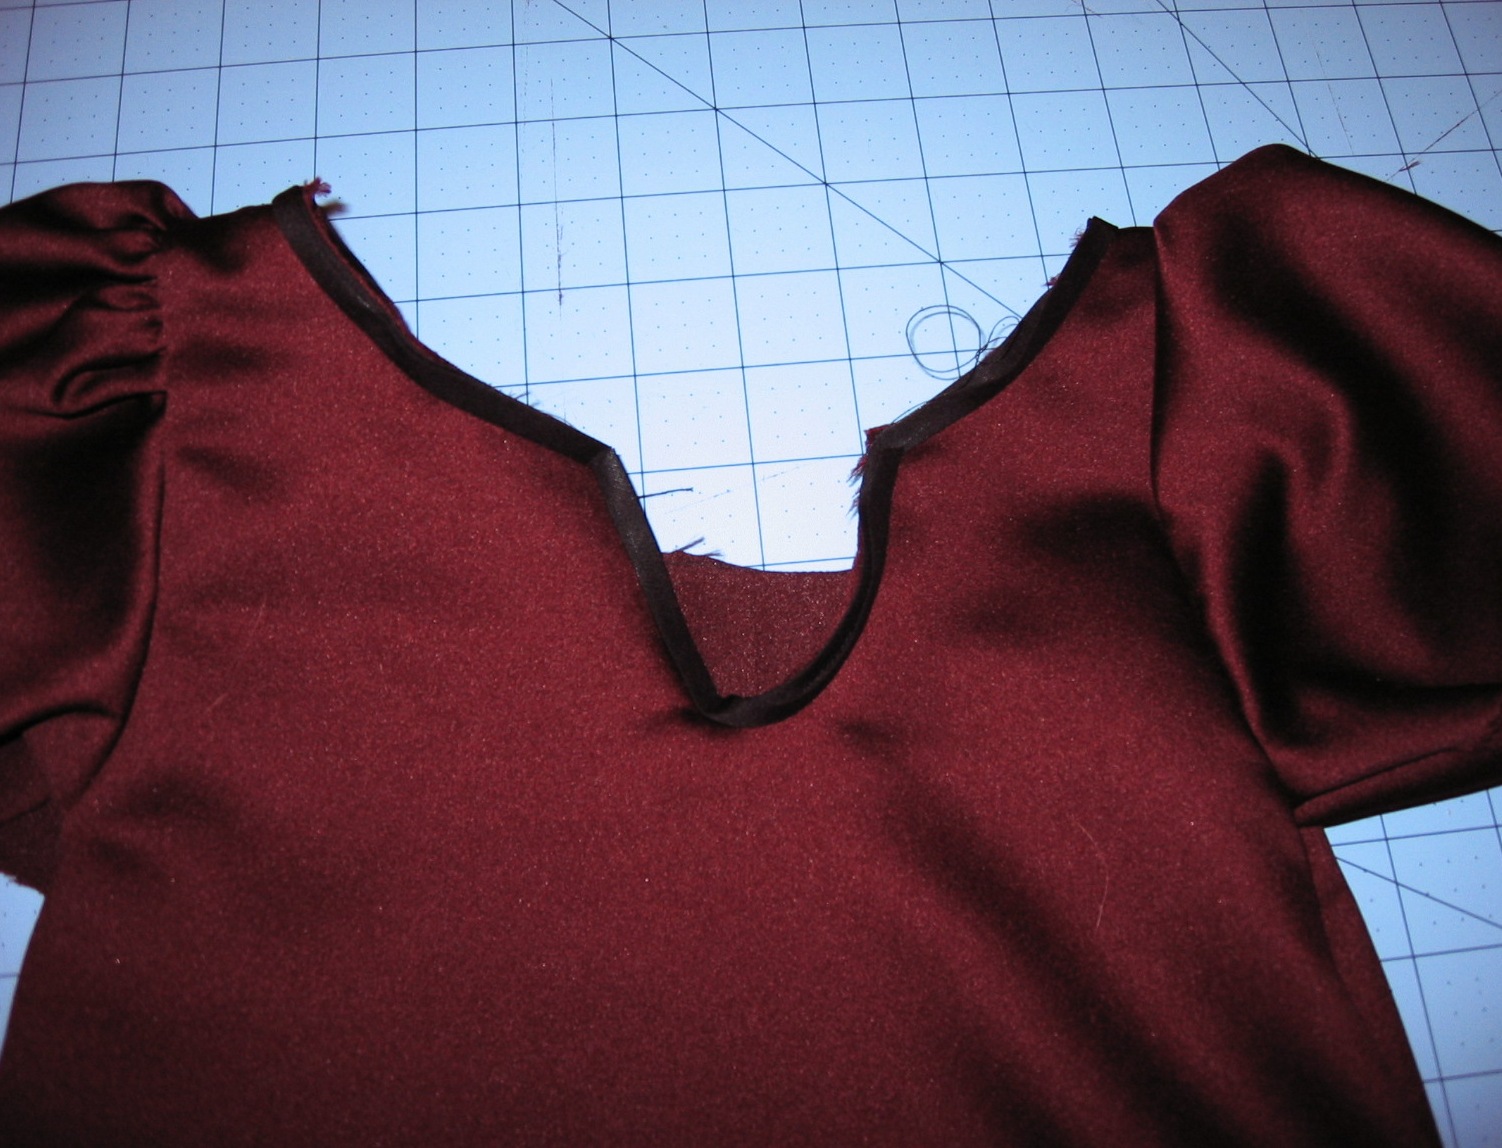
Next, we are going to finish off the neckline. Unless you are using a knit fabric or you used a seriously deep cut to the neckline, this dress is going to be a little tough to get over your little bean's head. To solve this problem, I cut a little keyhole in the back. Fold your dress lengthwise in half so you can make a little cut at the neckline for the keyhole.


With the corresponding bias tape, start at the top of the keyhole and go all the way around the neckline. Open the bias tape and place against the RIGHT side of the fabric. The edge of the bias tape parallel with the edge of the fabric. Pin in place if you would like. When you fold over the bias tape, it should look closed on the INSIDE of the dress. Hopefully that makes sense. Now sew it down along the middle/crease of the bias tape.. Repeat with a separate piece along the keyhole. Trim the corners of the keyhole before you fold this over. Now sew all around the neckline to secure bias tape down.

How ya doing? We're almost there! Now, we just need to attach a button and a sash or ribbon to finish it off. Forgive the switch back to the other fabric...some little toddler I know just threw my camera on the floor and it's having issues. I needed a new one badly anyways.
So, I bought little tiny buttons, but of course, you can use whatever you like.
Just sew the button down to one corner of your keyhole and then thread a loop with embroidery floss through the other side so it looks like this. Super easy.

Now for the ribbon. Sewing it down is entirely optional, but I would recommend it if your toddler is going to be active in the dress. Be sure to use a fabric ribbon that is meant to withstand washing. Being very careful to make sure that the ribbon is straight and level, pin it down on the front of the dress. Sew along the top of the ribbon from one side to the other and then sew along the bottom of the ribbon from one side to the other. Leave the back loose for tying (i.e. don't sew the ribbon on the back of the dress).

Please, please, please post pics of any of your party dresses using this tutorial!


 |
| Did I mention the sun hasn't been out in over a week...the skirt is actually burgundy. |
- 1 yard fabric
- ~1 yd. matching bias tape
- corresponding thread
- embroidery floss
- needle
- small button
- ~2 yards matching ribbon at least 1" wide
This is for a size 2T:


Once your pieces are cut, stack up the dress pieces and cut out armholes and neck holes. The arm hole should be about 6" long and should start from the top corner - do NOT cut into the top. Your neck can be however you like, but just be sure to leave 2" for the strap. I found it looked nice to cut the front and the back the same depth...it makes for a pretty back.


Okay, this is the tricky part - not to do, but to explain. So, you need to cut out the armhole on your sleeve pieces. Fold it in half along the 7.5" line (shown above). Place this piece under your dress piece with the fold facing inward.


Once this is done, you need to make some adjustments to your machine before you start sewing. Turn your tension knob all the way up (usually it will be set around 4-5, so turn it up to 9 or 10 (or however high your numbers go). Now, set your stitch length as long as it will go. Mine is digital and is typically at 2.5 and goes up to 5. You want it at 5.
We will be making a gather on the top of the sleeve piece that you see above. So unfold your piece and sew from one end to the other - DO NOT BACK STITCH to secure your stitching. Once this is done, you are going to pull on both ends of the threads until you have a nice gather the whole way along this piece. This is going to be the center of the shoulder of your dress.

IMPORTANT: Return your sewing machine to the original settings!
Before we go any further with this, we need to sew together the two dress pieces at the shoulder strap ONLY. Be sure to do a zig zag stitch after the straight stitch to secure your seams.
Once this is done, line up your sleeve piece with the center of the gathered part at the top of the shoulder. Place the rest of the piece into position and make sure that it all ends up in the right place. If this piece is still too long, then you may need to gather more fabric or gather the fabric more tightly. you may want to pin this down before sewing it. Be sure that the stitching is on the inside of the seam and does not show. Sew all around the armhole on both sides. Now repeat with the other sleeve. Your sleeves should look nice and puffy.

Now we want to sew up the sides of the dress and the sleeves. So, line them up at the armpit and sew the whole length from end of sleeve to hem of dress. Go back and zig zag stitch the whole length. Go ahead and turn your iron on now.

Lets finish off the sleeves. For the bottom of the sleeve, I just manually do about 3 pleats/gathers and then pin them down (right in the center). Now sew the seam as you normally would.


Go ahead and sew the hem of the dress now as well since you have it all ironed out.
Next, we are going to finish off the neckline. Unless you are using a knit fabric or you used a seriously deep cut to the neckline, this dress is going to be a little tough to get over your little bean's head. To solve this problem, I cut a little keyhole in the back. Fold your dress lengthwise in half so you can make a little cut at the neckline for the keyhole.


 |
| should look something like this. |
With the corresponding bias tape, start at the top of the keyhole and go all the way around the neckline. Open the bias tape and place against the RIGHT side of the fabric. The edge of the bias tape parallel with the edge of the fabric. Pin in place if you would like. When you fold over the bias tape, it should look closed on the INSIDE of the dress. Hopefully that makes sense. Now sew it down along the middle/crease of the bias tape.. Repeat with a separate piece along the keyhole. Trim the corners of the keyhole before you fold this over. Now sew all around the neckline to secure bias tape down.

 |
| Bias tape complete around edge. Now flip over to sew. |
 |
| All done |
So, I bought little tiny buttons, but of course, you can use whatever you like.
Just sew the button down to one corner of your keyhole and then thread a loop with embroidery floss through the other side so it looks like this. Super easy.

Now for the ribbon. Sewing it down is entirely optional, but I would recommend it if your toddler is going to be active in the dress. Be sure to use a fabric ribbon that is meant to withstand washing. Being very careful to make sure that the ribbon is straight and level, pin it down on the front of the dress. Sew along the top of the ribbon from one side to the other and then sew along the bottom of the ribbon from one side to the other. Leave the back loose for tying (i.e. don't sew the ribbon on the back of the dress).

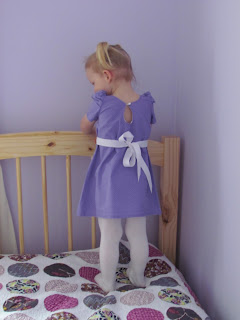
Here is the pic of the Christmas dress taken before the sash was attached and before the camera incident. Turn your neck sideways because every time I tried to rotate this particular photo, it would ruin it. What can I say, technology hates me today.
 |
| Finally found a use for that J Crew sash that used to be popular |
I will post an update with Little Bean in the dress along with my mama mini that I made out of the rest of the fabric. Stay tuned, please.
Please, please, please post pics of any of your party dresses using this tutorial!
Subscribe to:
Posts (Atom)